Using jQuery Plugins
In this post
you will learn the basic terminology of jQuery Plugins, where to get them and
even how to use them on the web page. The main emphasis of this post will be
how to incorporate them into our web page. I will keep my ideas simple so that
any fresher can also get into Plugins use.


What
is jQuery Plugins?
We all know
jQuery is a fast and concise JavaScript Libarary that simplifies HTML document
traversing, event handling, animating and also Ajax interactions for rapid web
developments. JQuery is specially designed to change the way that we write
JavaScript.
Now to
understand jQuery Plugin, you need to define the term 'Plugin'. Plugin is
actually set of software components and sometimes it may be very small in size
and it adds specific abilities to a larger software application. Some plugins
supports customizing functionality that let us get the full benefits and jQuery
Plugins has this functionality.
The day by day
growing jQuery community has created thousands of plugins from small selector
helpers to full scale UI widgets.
Why Plugins?
Some of the
main reasons include:
> It enable third-party developers to create abilities which extend an application
> To support easily adding new features
> Sometimes, to reduce the size of an application
> Sometimes, to separate source code from an application
> It enable third-party developers to create abilities which extend an application
> To support easily adding new features
> Sometimes, to reduce the size of an application
> Sometimes, to separate source code from an application
Where to get them?
jQuery provides
a large repository of plugins at http://plugins.jquery.com/.
On this portal you will find ratings of plugins, its running version, bug
reporting, demos, example codes, tutorials etc. One more repository portal is
well known in jQuery community is http://github.com/. You can download
the desired plugins (.js files) from these repository portals and attach it
with your project to use.
How
to attach plugins in project?
The use of jQuery plugins is very
straightforward, we just need to download the plugin codes (.js files) and
place it with your .js files in the project directory. If you remember the use
of jQuery library files, we can either use the .js file place on different
server or we can download .js file and place it in project directory. The same
technique we can use there with plugins. I personally never use the different
server for this; I just download one copy for my server because I can’t depend
on other server’s uptime.
Downloading
a Sample Plugin
Yes, that’s the point I wanted to come
shortly to show you how to use and customize plugins.
I am going to use ‘Cycle Plugin’, for this
I need to download plugin from here http://www.malsup.com/jquery/cycle/.
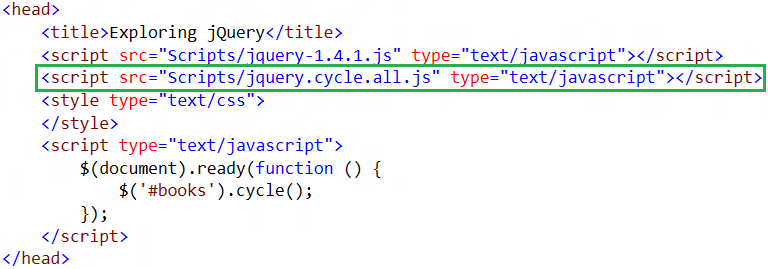
Once you have downloaded the plugin and
placed it inside your project directory, you need to place its reference inside
<head> tag.
Now, go ahead and create a sample HMTL
Markup that will contain images in a list and these images will cycle on page.
Nothing fancy in above markup. Remember to <ul>’s
‘id’ attribute because we will use this to target the imagelist.
Now go ahead and call the jQuery method
(which is defined in downloaded plugin file).
Now everything is set at the default to go.
Let’s run it and see the images in action.
So far we setup our project at default
level, jQuery also has feature to customize the plugins, and here you go.
Customizing
Plugin
Let’s assume we want to fast up its speed,
timeout and also want to pause its cycle when mouse goes up. Just simple
workaround will bring it on desired track. Don’t wait; just pass some parameter
values (like we did in C++/C#) from jQuery method.
And the output in browser is:


Comments
Post a Comment