Attribute Routing in MVC and Web API - exploring the goodness
In
this post you will learn about attribute routing and its goodness in MVC and
Web API. In the beginning I will show you what it is by comparing it with
Convention-based routing. As I progress in the post, I will show you its
advantages and its configuration then I will show you how we can use it in the
application by using various examples.
What is Routing?
Routing
in MVC and Web API is a pattern matching system that matches incoming request
and figure out what to do with that request. Inside application Routing engine
uses defined Route table for matching URI to an action. We have opportunity to
define one or more routes in the route table. We register this route table in
Application_Start (Global.asax) using following code.
RouteConfig.RegisterRoutes(RouteTable.Routes);
Let’s
look at default route for MVC and Web API, this is known as ‘Convention-based
Routing’ system.
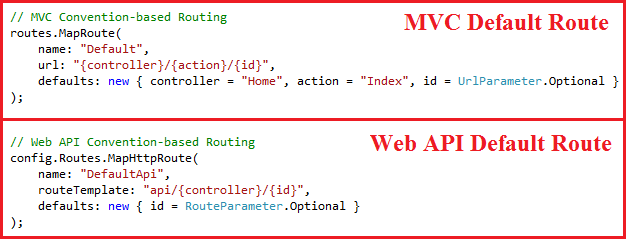
This
‘Convention-based routing’ routing system is awesome with certain limitations. Before
MVC 5 and Web API 2 Core 5, routing was only handled conventionally by adding
route to RouteCollection (in MVC RouteConfig.cs file) and HttpRouteCollection (in Web API WebApiConfig.cs file).
As
website grows and special cases accumulate it starts turning quite complex to
maintain this. And since routes (Convention-based routes) separated from the
controller they apply to, it can take some detective work to understand the
relationships and we are developers not detectivesJ.
So,
with MVC 5 and Web API 2 Core 5, Microsoft introduced ‘Attribute-based Routing’
or simply ‘Attribute Routing’. It simplifies the Routing system that we earlier
using in MVC as well as Web API. Attribute Routing uses attribute/annotation
with controllers as well as action methods to define routes and gives way more
control over the URIs. The earlier routing style is still fully supported, in
fact we can easily combine both techniques in the same application.
Attribute Routing -
one of the community contribution
As
we all know Microsoft accepts community contribution and Attribute Routing in
ASP.NET MVC and Web API is one of the contribution by Tim McCall, the author of
http://attributerouting.net.
Attribute Routing or Convention-based
Routing - what to use?
I
personally recommend using ‘Attribute Routing’ however you can use any or both.
In my all new applications I use one default route (Convention-based) so that
it keeps my application alive even when I miss annotating controller/action
with this new Attribute-based routing.
Can we delete
earlier Convention-based Routing?
Yes
we can delete earlier Convention-based Routing and stick with new ‘Attribute
Routing’ if we want to but remember to annotate each controllers/actions with
latest attribute routing, it will not kill your application.
If
you are still not convinced, you should read this post by Kevin Montrose Why
I Love Attribute Based Routing.
Enabling Attribute Routing in the
application
To
use Attribute Routing all you need is listed below.
Visual
Studio 2013
MVC
5 (if MVC Application)
Microsoft
ASP.NET Web API 2 Core 5 (if Web API Application)
If
MVC Application, then you manually need to add following code in RouteConfig.cs
file.

If
Web API Application, then you manually need to add following code in WebApiConfig.cs
file.

Look
at both images (MVC Routing and Web API Routing) above, I have combined Attribute
Routing with Convention-based routing and it works. I can completely delete
anyone if I wanted it will not break application if no any controller/action depend
directly.
Now
you are good to use Attribute Routing in your MVC and Web API Applications.
I
found many stack-overflow questions asking, do we need to install this package by
Tim McCall in order to use Attribute Routing in MVC or Web API. Answer is ‘NO’,
if you have MVC 5 or Web API 2 Core 5, you no longer need this package because
it is already available in your application as a core bits.

Using Attribute Routing in the
application (MVC or Web API)
Now
let’s start using Attribute Routing in MVC and Web API Applications. I will
show examples using MVC and Web API side by side. Look at the following code,
this is the default code that uses Convention-based Routing.

Now
let’s turn this code into Attribute-based Routing.

Once
this in place I can go and delete the Convention-based Routes if I wanted to.

You
don’t need to delete at all, it will still work. If you notice I have added routes.MapMvcAttributeRoutes()
and config.MapHttpAttributeRoutes() before the Convention-based Routes, this
tells runtime to first look at Attribute-based Routes in controllers and
actions if it is not there make use of Convention-based default routes. This is
how system works.
Let’s
go ahead and explore something cooler.
RoutePrefix in Attribute Routing - to avoid code
repetition
In
case you don’t want to repeat the route prefix every time with action methods
like we repeated in above image, we can use RoutePrefix attribute with
controller directly as given below.

This
way we can avoid repeating same code and do things DRY. Look at the Edit action
method, it uses id parameter [Route("Edit/{id}")],
we can also use such parameters with RoutePrefix if needed, example [RoutePrefix("{Author}/Books/{Id}")].
RoutePrefix Overriding in Attribute Routing
You
can also override the RoutePrefix, this is required when you need every action
methods to use RoutePrefix and any method not to use that. Here is the way.
[RoutePrefix("Books")]
public class BooksController : Controller
{
// GET:
/CS/Abhimanyu/1988
[Route("~/CS/{author}/{id}")]
public ActionResult Index()
{
return View();
}
}
In
above code, to hit this action we need to browse
Route Constraints in Attribute Routing
Unlike
Convention-based Routing it is possible to use route constraints with Attribute
Routing. Read my one of the article, if you don’t know anything about Route
Constraints with Convention-based Routing.
Basically,
Route constraints lets us restrict how the parameters in the route template are
matched. The general syntax is "{parameter:constraint}".
Look
at following code snippet, it will accept any integer ‘id’ for Details method.
[RoutePrefix("Books")]
public class BooksController : Controller
{
// GET:
/Books/Details/5
[Route("Details/{id}")]
public ActionResult Details(int id)
{
return View();
}
}
Let’s
assume if I want to restrict the ‘id’ value to 1 to 1000, we can achieve this
also.
[RoutePrefix("Books")]
public class BooksController : Controller
{
// GET:
/Books/Details/5
[Route("Details/{id:range(1,1000)}")]
public ActionResult Details(int id)
{
return View();
}
}
There
is list of constraints we can use and you can find it here. We can also create
custom route constraint by implementing the IHttpRouteConstraint interface and
registering it with runtime.
Optional URI Parameters and Default Values in Attribute
Routing
We
can mark any parameter optional by adding a question mark to the route
parameter. If a route parameter is optional, you must define a default value
for the method parameter.
[Route("Books/Details/{id:int?}")]
public ActionResult Details(int id=1)
{
return View();
}
In
the above example, I marked ‘id’ as integer optional and also a default value
in the method parameter. In case request has no ‘id’, this default value ‘1’
will be used.
So,
/Books/Details/876 and /Books/Details will return same resource.
Alternatively,
we can define default value with route annotation directly.
[Route("Books/Details/{id:int=1}")]
public ActionResult Details(int id)
{
return View();
}
The
main difference between first snippet and second snippets is, first will assign
‘1’ directly to the method parameter, so the parameter will have this exact
value. Second will assign ‘1’ to annotation which will follow the model binding
process for value conversion.
Route Names in Attribute Routing
Unlike
Named Routes in Convention-based Routing we can define Route name for Attribute
Routing. Here is a great blog by me on Convention-based
Routing,
read it in case you missed.
We
can specify a name for a route and this name can be used to general URL easily.
Look at this code snippets I have used ‘bookDetails’ as route name.
[Route("Details/{id}",
Name="bookDetails")]
public ActionResult Details(int id=1)
{
return View();
}
Now,
we can use it to generate link, this way.
@Html.RouteLink("Book
Details", "bookDetails", new { id = 1 })
This
link will take you to following page http://localhost:9581/Books/Details/1.
Hope
this helps.


Good one , first time i know about attributed Routs by your article and its relay amazing feature..
ReplyDeletegood going..
:) nive nice simply nice
ReplyDeletegreat article, thx :)
ReplyDeleteCan You please tell me the way or syntax to add validation for two or more parameters of a method/action
ReplyDelete