Nested Collection Models in MVC to Add Multiple Phone Numbers - Part 2
This
is Part 2 of the article series. Actually, in this article series we were developing an MVC application that will allow adding multiple phone numbers using Nested Model Concept. User will be able to add or remove (zero or more phone numbers, I need minimum two phone numbers for each employee) phone numbers for any single employee.
In the next post I will show you how to List, Edit, Delete record(s) in such nested (relational) models concept.


In the next post I will show you how to List, Edit, Delete record(s) in such nested (relational) models concept.
Step 4: Deleting
Phone Number
Before
going further here just think how you want your application to behave like you
could send the DELETE request to the server immediately after clicking on
‘Remove’ link, but think what when user cancels the form, big problem here because
you already deleted records. So, it would be much better to update the value="True"
of hidden input control and let the controllers do the rest. And as you know
this hidden input control is backed by model property ‘DeletePhone’, so value="True"
means DeletePhone="True". Great!
So,
to delete any phone numbers we need a link for each generated input boxes. This
link should have a JavaScript method call with what to delete (means hiding div.phoneNumber)
and what to update (means updating value="True" of hidden field) as parameters.
To
build such advanced link (which also makes JS method call) on View page we need
to take the power of HtmlHelper class. Add a class inside Model folder with
name ‘HtmlHelpers.cs’ and use following codes.
public static class HtmlHelpers
{
public static IHtmlString RemoveLink(this HtmlHelper htmlHelper, string linkText, string container, string deleteElement)
{
var js = string.Format("javascript:removeNestedForm(this,'{0}','{1}');return
false;", container, deleteElement);
TagBuilder tb = new TagBuilder("a");
tb.Attributes.Add("href", "#");
tb.Attributes.Add("onclick", js);
tb.InnerHtml = linkText;
var tag = tb.ToString(TagRenderMode.Normal);
return MvcHtmlString.Create(tag);
}
}
If
you don’t know how such HtmlHelper work read
it here.
In above code we are creating a new helper that has name ‘RemoveLink’ and it
will take three parameters linkText (to be displayed on UI), container (div to
hide) and deleteElement (div to update).
Now,
to use this newly added helper on Phone.cshtml view page, update this view page
as given below.
Updated
Phone.cshtml
@model
NestedModelsMvc.Models.Phone
@using NestedModelsMvc.Models
<div class="phoneNumber">
<p>
<label>Phone Number</label>
@Html.TextBoxFor(x => x.PhoneNumber)
@Html.HiddenFor(x => x.DeletePhone, new { @class = "mark-for-delete"
})
@Html.RemoveLink("Remove", "div.phoneNumber", "input.mark-for-delete")
</p>
</div>
Just
two changes a new namespace and new helper, take a closer look at the passed
parameters and compare it with above helper method.
Notice,
in above helper method I am making a call to a JS method removeNestedForm(this,
container, deleteElement), we need to implement this too. Add a .js file with
name ‘CustomJs.js’ somewhere (preferably inside Scripts folder on project root)
in your application and write following code.
CustomJs.js
function removeNestedForm(element, container, deleteElement) {
$container = $(element).parents(container);
$container.find(deleteElement).val('True');
$container.hide();
}
Master
peace code, as this will update and hide HTML control/tag at the client. You
also need put a reference of this newly added JS file on New.cshtml view page.
Updated
New.cshtml
@{
ViewBag.Title = "New";
}
<script src="~/Scripts/CustomJs.js"></script>
<h2>Add New Employee</h2>
@using (Html.BeginForm()){
@Html.AntiForgeryToken()
@Html.EditorForModel()
<p>
<button type="submit">Create Employee</button>
</p>
}
Now,
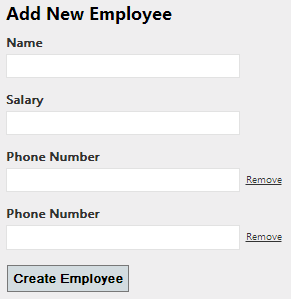
run the application and look at the changes in UI.
Let’s
take a closer look to see what’s going on after such updates. You will be able
to see the remove link and also able to remove (call it delete if you like)
input controls.

In
above image, look at the changes when I marked second Phone Number to remove.
It marked the div not to display and updated the hidden field parameter to value="True".
When
you look at the server side processing of the same actions you will see
following things going on.
In
the Phones collection, first Phone has a field DeletePhone which has value
‘null’ means don’t do anything with this. But second Phone has a field
DeletePhone which has value ‘true’ means controller will take an action to
delete it from database table. We are going well.
Step 5: Adding New
Phone Numbers
There
will be a link and when user clicks the link a new Phone collection will be
added with appropriate index based naming.
So,
to build such advanced link (which also makes JS method call) on View page we
need to take the power of HtmlHelper class. Rather adding another new class
inside Model folder I will add following code (by keeping previous codes) inside
‘HtmlHelpers.cs’ and use following codes.
public static class HtmlHelpers
{
// ... previous
codes
public static IHtmlString AddLink<TModel>(this HtmlHelper<TModel> htmlHelper, string linkText, string containerElement, string counterElement, string collectionProperty, Type nestedType)
{
var ticks = DateTime.UtcNow.Ticks;
var nestedObject = Activator.CreateInstance(nestedType);
var partial = htmlHelper.EditorFor(x =>
nestedObject).ToHtmlString().JsEncode();
partial = partial.Replace("id=\\\"nestedObject", "id=\\\"" + collectionProperty + "_" + ticks + "_");
partial = partial.Replace("name=\\\"nestedObject", "name=\\\"" + collectionProperty + "[" + ticks + "]");
var js = string.Format("javascript:addNestedForm('{0}','{1}','{2}','{3}');return
false;", containerElement,
counterElement, ticks, partial);
TagBuilder tb = new TagBuilder("a");
tb.Attributes.Add("href", "#");
tb.Attributes.Add("onclick", js);
tb.InnerHtml = linkText;
var tag = tb.ToString(TagRenderMode.Normal);
return MvcHtmlString.Create(tag);
}
private static string JsEncode(this string s)
{
if (string.IsNullOrEmpty(s)) return "";
int i;
int len = s.Length;
StringBuilder sb = new StringBuilder(len + 4);
string t;
for (i = 0; i < len; i += 1)
{
char c = s[i];
switch (c)
{
case '>':
case '"':
case '\\':
sb.Append('\\');
sb.Append(c);
break;
case '\b':
sb.Append("\\b");
break;
case '\t':
sb.Append("\\t");
break;
case '\n':
break;
case '\f':
sb.Append("\\f");
break;
case '\r':
break;
default:
if (c < ' ')
{
string tmp = new string(c, 1);
t = "000" + int.Parse(tmp,
System.Globalization.NumberStyles.HexNumber);
sb.Append("\\u" +
t.Substring(t.Length - 4));
}
else
{
sb.Append(c);
}
break;
}
}
return sb.ToString();
}
}
You
will find two methods in above code, first will generated the helper and second
will encode string to make JavaScript safe. We don’t need HTML safe because we
already using Razor syntax which is smart enough to deal with such risks.
The
helper method AddLink will take few parameters linkText (text to display with
link), containerElement (where to place on the DOM), counterElement (for index
based control naming), collectionProperty (name of the collection which is
‘Phone’), nestedType (which is Models.Phone).
I
need this helper to appear on UI once, so I would add this on Employee.cshtml
view page. Here is the updated code.
@model
NestedModelsMvc.Models.Employee
@using NestedModelsMvc.Models
@Html.HiddenFor(x => x.EmployeeId)
<p>
<label>Name</label>
@Html.TextBoxFor(x => x.Name)
</p>
<p>
<label>Salary</label>
@Html.TextBoxFor(x => x.Salary)
</p>
<div id="phoneNumbers">
@Html.EditorFor(x => x.Phones)
</div>
<p>
@Html.AddLink("Add More Phone Numbers", "#phoneNumbers", ".phoneNumber", "Phones", typeof(NestedModelsMvc.Models.Phone))
</p>
Just
two changes a new namespace and new helper, take a closer look at the passed
parameters and compare it with above helper method.
Notice,
in above helper method I am making a call to a JS method addNestedForm(containerElement,
counterElement, ticks, partial), we need to implement this too. So, rather
adding another .js file I will prefer using previous one which is ‘CustomJs.js’
and add following code.
CustomJs.js
//...previous
code
function addNestedForm(container, counter, ticks, content) {
var nextIndex = $(counter).length;
var pattern = new RegExp(ticks, "gi");
content = content.replace(pattern,
nextIndex);
$(container).append(content);
}
Master
peace code, as this will upend the new collection to the DOM at the client. We
already have place the reference of this file on New.cshtml, so nothing to
worry.
Step 6: Controller
Action Setup
I
am using following POST version of New Action method, just to test application.
public class EmployeeController : Controller
{
public ActionResult New()
{
var employee = new Employee();
employee.CreatePhoneNumbers(2);
return View(employee);
}
[HttpPost]
public ActionResult New(Employee employee)
{
// TODO
return Redirect("New");
}
}
Put
a breakpoint on line return Redirect(“New”) and hit F5.
Here
is my running view, now I can add or remove Phone Numbers:
And
when I click on above button ‘Create Employee’, see what’s happening on server
side.
One
Phone Number out of four is marked for deleting.
Step 7: Inserting Employee and Phones data in Database
To do this, use the code given below which will remove all the phone numbers which is marked for deletion from the collection. After deleting, insertion will take place.
Updated
New ActionResult method with following code:
[HttpPost]
public ActionResult New(Employee employee)
{
CompanyEntities db = new CompanyEntities();
if (ModelState.IsValid)
{
foreach (Phone phone in employee.Phones.ToList())
{
if (phone.DeletePhone == true)
{
//
Delete Phone Numbers which is marked to remove
employee.Phones.Remove(phone);
}
}
db.Employees.Add(employee);
db.SaveChanges();
}
return Redirect("New");
}
You
can see, I’m removing all the phone numbers from the ‘Phones’ collection which
is marked for deletion.
And
now you all set to run this application which will store your employee data and
phone numbers collection in database.
Find Part 3 here.
Find Part 3 here.
Source Code: https://github.com/itorian/NestedCollectionMVC
This
article is completely inspired from an article posted by jarrettmeyer here: http://jarrettmeyer.com/post/2995732471/nested-collection-models-in-asp-net-mvc-3
Hope
this helps.


Hi Abhimanyu Kumar Vatsa.
ReplyDeleteI love your work here.
I am trying to use the code for adding new phone numbers in step 5, but in the line "var partial = htmlHelper.EditorFor(x => nestedObject).ToHtmlString().JsEncode();" I'm getting an error saying that EditorFor could not be found. Am I missing something here?
Thanks
Nick
I had the same problem. You should add "using System.Web.Mvc.Html;" and it works.
DeleteSame problem. "var partial = htmlHelper.EditorFor(x => nestedObject).ToHtmlString().JsEncode();" doesn't compile because of "EditorFor".
ReplyDeleteHello Abhi, i try do this but I have the following error:
ReplyDelete'string' does not contain a definition for 'JsEncode' and no extension method 'JsEncode' accepting a first argument of type 'string' could be found (are you missing a using directive or an assembly reference?)
I'm using:
using System;
using System.Web;
using System.Web.Mvc;
using System.Web.Mvc.Html;
Thanks
Very clear explanation. thanks a lot Abhimanyu
ReplyDeleteI read the first 2 parts of this tutorial and find it very helpful. Thank you for that. I have a question though. I can add multiple phone numbers and save to the database. Once I add Jquery validation, like add [required] to an attribute of employee, if that attribute does not validate, when the screen postback, all my phone numbers that I have entered disappear from the screen. I have to click the add button again for all of them and retype them. Is there a way to track the number of added phone numbers and on postback maintain that information?
ReplyDeleteHow can I get this to work when there are validation errors? Currently all added phones clear when there is a validation error
ReplyDeleteHello,
DeleteI had the same problem and after a few hours I found the solution.
For the jQuery Validator unobtrusive know correctly display the span with the message set to the DataNotations properties "data-valmsg-for =" and "for =" also need to be replaced in the Extension method "AddLink" getting as follows:
public static IHtmlString AddLink(this HtmlHelper htmlHelper, string linkText, string containerElement, string counterElement, string collectionProperty, Type nestedType)
{
...
partial = partial.Replace("data-valmsg-for=\\\"nestedObject", "data-valmsg-for=\\\"" + collectionProperty + "[" + ticks + "]");
partial = partial.Replace("for=\\\"nestedObject", "for=\\\"" + collectionProperty + "[" + ticks + "]");
...
}
But after adding dynamic elements html, you need reapply the jquery validator.
For this:
- Access https://xhalent.wordpress.com/2011/01/24/applying-unobtrusive-validation-to-dynamic-content/
- Copy for your application this extension of unobtrusive jquery and import after it.
- In js function "addNestedForm", add at the end of it the call to extension, like:
function addNestedForm(container, counter, ticks, content) {
...
$.validator.unobtrusive.parseDynamicContent('form');
}
Good luck!