Creating Master Page (Using CSS) in ASP.NET Part 1
Introduction
Master Page enables us to share the same content among multiple content pages in a website. We can use a Master Page to create a common page layout. For example, if we want all the pages in our website to share a three-column layout, we can create the layout once in a Master Page and apply the layout to multiple content pages. We also can use Master Pages to display common content in multiple pages. For example, if we want to display a standard header and footer in each page in our website, then we can create the standard header and footer in a Master Page. By taking advantage of Master Pages, we can make our website easier to maintain, extend, and modify. If we need to add a new page to our website that looks just like the other pages in our website, then we simply need to apply the same Master Page to the new content page. If we decide to completely modify the design of our website, we do not need to change every content page. We can modify just a single Master Page to dramatically change the appearance of all the pages in our application by using CSS. Take a look at example below for more understanding.
Using CSS in Master Page
Master Page has .master extension and we create a Master Page by creating a file that ends with the .master extension. We can locate a Master Page file any place within an application. We also can add multiple Master Pages to the same application.
<%@ Master Language="VB" CodeFile="MasterPage.master.vb"Inherits="MasterPage" %>
<!DOCTYPE html PUBLIC "-//W3C//DTD XHTML 1.0
Transitional//EN""http://www.w3.org/TR/xhtml1/DTD/xhtml1
transitional.dtd">
<html>
<head id="Head1" runat="server">
<style type="text/css">
html
{
background-color:silver;
font:14px Arial,Sans-Serif;
}
.content
{
margin:auto;
width:700px;
background-color:white;
border:Solid 3px blue;
}
.leftColumn
{
float:left;
padding:5px;
width:200px;
}
.rightColumn
{
float:left;
padding:5px;
height:auto;
border-left:dotted 3px blue;
}
.clear
{
clear:both;
}
</style>
<title>Using CSS in Master Page</title>
</head>
<body>
<form id="form1" runat="server">
<div class="content">
<div class="leftColumn">
<asp:contentplaceholder
id="ContentPlaceHolder1"
runat="server"/>
</div>
<asp:contentplaceholder
id="ContentPlaceHolder1"
runat="server"/>
</div>
<div class="rightColumn">
<asp:contentplaceholder
id="ContentPlaceHolder2"
runat="server"/>
</div>
<asp:contentplaceholder
id="ContentPlaceHolder2"
runat="server"/>
</div>
<br class="clear" />
</div>
</form>
</body>
</html>
In above example, Master Page looks very much like a normal ASP.NET page. In fact, we can place almost all the same elements in a Master Page that we could place in an ASP.NET page, including HTML, server-side scripts, and ASP.NET controls. There are two special things about the Master Page. First, file contains a <%@ Master %> directive instead of the normal <%@ Page %> directive. Second, Master Page includes a ContentPlaceHolder control which is referral for child pages/content page. When the Master Page is merged with a particular content page, the content from the content page appears in the areas marked by ContentPlaceHolder controls. We can add as many ContentPlaceHolders to a Master Page as we need.
The Master Page given below has two-column page layout. Each ContentPlaceHolder control is contained in a separate <div> tag. Cascading Style Sheet (CSS) rules are used to position the two <div> tags into a two-column page layout.
The content page, which is using master page given below.
<%@ Page Title="" Language="VB" MasterPageFile="~/MasterPage.master"
</div>
</form>
</body>
</html>
In above example, Master Page looks very much like a normal ASP.NET page. In fact, we can place almost all the same elements in a Master Page that we could place in an ASP.NET page, including HTML, server-side scripts, and ASP.NET controls. There are two special things about the Master Page. First, file contains a <%@ Master %> directive instead of the normal <%@ Page %> directive. Second, Master Page includes a ContentPlaceHolder control which is referral for child pages/content page. When the Master Page is merged with a particular content page, the content from the content page appears in the areas marked by ContentPlaceHolder controls. We can add as many ContentPlaceHolders to a Master Page as we need.
The Master Page given below has two-column page layout. Each ContentPlaceHolder control is contained in a separate <div> tag. Cascading Style Sheet (CSS) rules are used to position the two <div> tags into a two-column page layout.

The content page, which is using master page given below.
<%@ Page Title="" Language="VB" MasterPageFile="~/MasterPage.master"
AutoEventWireup="false"CodeFile="Default.aspx.vb" Inherits="_Default" %>
<asp:Content
ID="LeftOne"
ContentPlaceHolderID="ContentPlaceHolder1"
Runat="Server">
<b>This is heading like text for right column.</b>
<br />This is my data area.
<br />This is my data area.
<br />This is my data area.
<br />This is my data area.
</asp:Content>
ID="LeftOne"
ContentPlaceHolderID="ContentPlaceHolder1"
Runat="Server">
<b>This is heading like text for right column.</b>
<br />This is my data area.
<br />This is my data area.
<br />This is my data area.
<br />This is my data area.
</asp:Content>
<asp:Content
ID="RightOne"
ContentPlaceHolderID="ContentPlaceHolder2"
Runat="Server">
<b>This is menu like text for left column.</b>
<br />This is my data area.
<br />This is my data area.
<br />This is my data area.
<br />This is my data area.
<br />This is my data area.
<br />This is my data area.
<br />This is my data area.
<br />This is my data area.
<br />This is my data area.
</asp:Content>
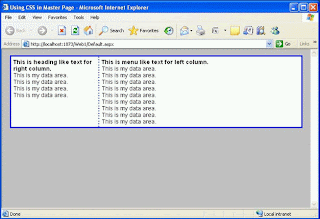
When we open the above page in a web browser, the contents of the page are merged with the Master Page. The Master Page is associated with the content page through the MasterPageFile attribute included in the <%@ Page %> directive. This attribute contains the virtual path to a Master Page. Content page does not contain any of the standard opening and closing XHTML tags. All these tags are contained in the Master Page. All the content contained in the content page must be added with Content controls. We must place all the content contained in a content page within the Content controls. If we attempt to place any content outside these controls, we get an exception. The Content control includes a ContentPlaceHolderID property. This property points to the ID of a ContentPlaceHolder control contained in the Master Page. Within a Content control, we can place anything that we would normally add to an ASP.NET page, including XHTML tags and ASP.NET controls.
Note: Continue in Next Part.
ID="RightOne"
ContentPlaceHolderID="ContentPlaceHolder2"
Runat="Server">
<b>This is menu like text for left column.</b>
<br />This is my data area.
<br />This is my data area.
<br />This is my data area.
<br />This is my data area.
<br />This is my data area.
<br />This is my data area.
<br />This is my data area.
<br />This is my data area.
<br />This is my data area.
</asp:Content>
When we open the above page in a web browser, the contents of the page are merged with the Master Page. The Master Page is associated with the content page through the MasterPageFile attribute included in the <%@ Page %> directive. This attribute contains the virtual path to a Master Page. Content page does not contain any of the standard opening and closing XHTML tags. All these tags are contained in the Master Page. All the content contained in the content page must be added with Content controls. We must place all the content contained in a content page within the Content controls. If we attempt to place any content outside these controls, we get an exception. The Content control includes a ContentPlaceHolderID property. This property points to the ID of a ContentPlaceHolder control contained in the Master Page. Within a Content control, we can place anything that we would normally add to an ASP.NET page, including XHTML tags and ASP.NET controls.
Note: Continue in Next Part.


Comments
Post a Comment